
Installing and Adjusting the Reinforced Loop Sling and Rifleman's Essential Sling
Properly setting up your new RS-1 Reinforced Loop Sling or RS-2 Rifleman's Essential Sling will help familiarize you with your new favorite sling and will also set you up for success down the road. There's nothing worse than fiddling with gear when you need it to be functioning... except maybe backpacks with loose straps, flying all over the place, looking like a rock drummers hair. But back to the slings. This step by step guide complete with pictures will get your sling and rifle ready to go. Still haven't picked one up? Find the Reinforced Loop Sling here, and the Rifleman's Essential Sling here.
Your sling has three parts and two sections.
Parts:
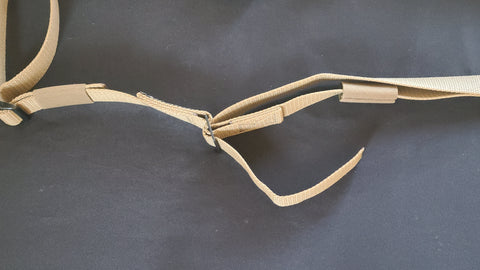
Metal Tri-Glide/Buckle- This is roughly in the middle of your sling. It has both sections sewn to it and the shooting loop feeds back through it.

Slide Down Loop Keeper (SDLK)- This is the sewn webbing that the shooting loop feeds through twice, it serves to hold your arm in the loop when position/clothing/conditions prevent the rear of the shooting loop from staying in an optimal position on your arm. I also use it when slung in the shooting loop for extended periods of time in order to relax a little bit while staying ready to bring the rifle up and steady for a shot.
Plastic Tri-Glide- The plastic tri-glide serves to adjust the overall length of your sling for a comfortable transport length.

Sections:
Forward Section- The forward section of your sling is the shooting loop. This is the longest section of webbing that feeds through the SDLK, then the sling swivel, then back through the SLDK, and finally through the metal buckle to set your shooting loop size.
Rear Section- This section is for setting the overall carrying or slung length of your sling. Change this to get the rifle to "sit right" on your shoulder after finding a proper shooting loop length.
Orientation:
Layout of the RS-1 Reinforced Loop Sling and the RS-2 Rifleman's Essential Sling is very similar, the main difference being the appearance and function of the shooting loop created by the reinforced webbing on the RS-1. To properly lay out your sling, lay the forward section at the fore-end of your stock. The rear section should be at the butt of the stock. The RifleCraft tag should be facing your rifle, not facing outward from your rifle.

Install the rear section of the sling first. Then put the front swivel on the swivel stud. To make looping up faster and more comfortable, hold the front swivel and twist it 180 degrees clockwise before installing the swivel on the stud. Left handed shooters just turn it counterclockwise.
Adjusting the sling:
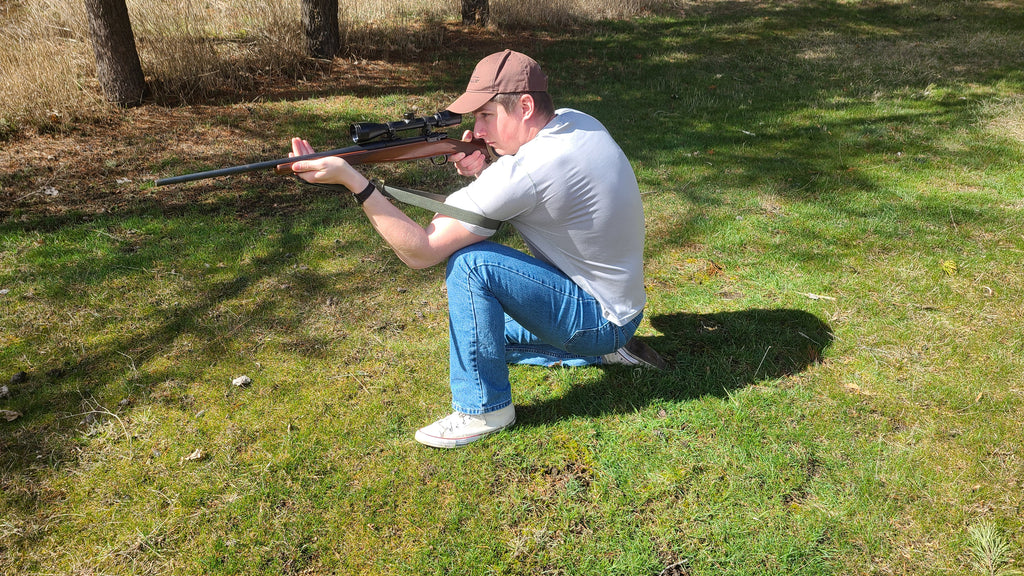
We'll start with the shooting loop. It is important for a shooting loop to have the right amount of tension in order to maximize accuracy gains. A shooting sling should be adjusted from a proper position, with the rear of the shooting loop sitting where the posterior deltoid and the long head of the tricep meet. The shooting loop should be pulled tight by your hand being looped into the webbing and the butt of the rifle being seated into your shoulder.

Next, take up your favorite unsupported shooting position and ensure a tight fit of the shooting loop. With a couple adjustments you can get the loop to a proper tension while taking up a shooting stance in kneeling, seated, and TJ Prone (Slav squat). If you plan to shoot more from a prone unsupported position I recommend optimizing that adjustment and compromising a little on the other positions. Personally, I prefer to keep it really snug for the three positions above. Most of the brush I hunt in is too tall to allow prone shot, plus my hunting partner and mentor gets mad if I fuss around for a prone position when the shot has already presented itself. More on that later.
Once your shooting loop is where you like it, trim the excess webbing! Leaving 6-7 inches past the metal tri-glide will give you enough excess to adjust it for more clothing or a different shooter. Your friends might make fun of you if they see you adjusting your new sling in July with your winter coat on, but you'll have the last laugh once it gets cold and your sling has enough room for adjusting. Melt the cut edge of the webbing to avoid fraying, it can be done with a lighter, or if you're single, on the stove with the fan on. Next, fold the excess webbing into itself.
Fold it inwards

Then secure it with the elastic keeper!

Give the shooting loop a sharp pull, if your webbing slips, adjust and repeat until you secure your sling. I recommend 2 pound feet of force for every multiple of 100 that your rifle cost. ;)

Adjusting the rear of the sling will give you more or less overall length to your sling without having to adjust your shooting loop. Feed both pieces of webbing through the plastic tri-glide until you have enough room to either tighten or loosen your sling. More webbing past the tri-glide is tighter and less webbing is looser. If your slack is more than 6 inches, you can trim and burn it or simply move the plastic triglide to reduce the slack but keep the overall length. The plastic triglides are more narrow than the metal buckle and do not need the same method of securing as the shooting loop. Feed the tag end through the elastic keeper and your sling is ready to go!
Here are video instructions on sling swivel installation for the RS-1 Reinforced Loop Sling. Detailed video instructions of the RS-2 Rifleman's Essential Sling are also available.
Thanks for reading! If this content interested you and you would like to see more or have specific requests, comments, suggestions please don't hesitate to contact me at bennett@rifle-craft.com.